Tutorial- How to create your own accounting app in Sketchware

Accounting app screenshot


In today's tutorial we will cover how to create your own accounting app using Sketchware. Sketchware is an app that lets you create your own app without any coding. Sketchware uses a simple drag and drop feature and the awesome part is that you can do this on your mobile phone. You can download Sketchware here

If you're just getting started with Sketchware you can check out more tutorials on how to create your own apps here.

This tutorial will help you understand how the listview works. This is probably one of the most important lessons you will cover as the concept can be adapted and used in numerous scenarios. 


Duration:

This should take about 2-4 hours depending on your speed.


STEP 1: CREATE A NEW PROJECT

Start by creating a new  Sketchware project. If you are not sure how to create a new activity check out this link to help you get started with Sketchware. After creating my new project I can then move on to the next step.


STEP 2: CREATE YOUR LAYOUT

To create my layout I started by dragging a linear(Horizontal) onto the screen

Inside the linear H place a textview and set weight to 1.

Add an imageview next to the textview and change the imageview to an icon to add.

Add a listview under the linear.

Your linear should look like the one below.

Accounting app main layout


STEP 3: Go to the events section.

 We now need to work on our logic and so let's navigate to the events section as shown in the image below

Sketchware events tab


STEP 4: Create a new onStart event 

This event will determine what happens when our app starts. We can create a new onStart event by following the steps as shown in the images below


Add a new event button


Choose an event to add


STEP 5: Open the onStart event that you created


Open onStart event


STEP 6: Click the blue button as shown below


Add new blocks

You will see the blocks as shown below

Sketchware blocks


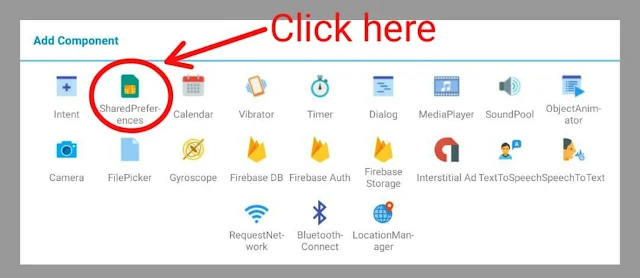
STEP 6: Create a new Shared preferences component as shown below.

Create component


Locating the shared preferences component

Naming your shared preferences component


STEP 7: Create a new list map variable


Follow the steps in the sequence shown below. I named my list map "ledger".


Create a list map


STEP 8: Add logic onStart 


Add the following blocks onStart. If you're still a newbie I suggest you copy word for word to avoid any problems when running the app. 


onStart logic

STEP 9: Create a customview


Create a new customview with the name "Transaction display". This will determine how the data will be displayed in the listview.

Create a new customview

Create a customview


STEP 10: Create your display layout


Add a linear horizontal and 5 textviews as shown below.

Customview layout

Step 11: Link your customview to listview


The next step is to go back to our main activity and link our customview to our listview. 

Link listview to custom view


STEP 12: Go to OnbindCustomview


After linking your customview, the next step is to go to the OnbindCustomview event. 
 
How to find OnbindCustomview


Step 13: Set up your OnbindCustomview logic


In OnbindCustomview place you blocks as follows. This will determine what is displayed in each textview on our customView. In this case we want to display the following keys:

• date
• details
• folio
• debit
• credit


OnbindCustomview logic

STEP 14: Create a new activity.


This is where we will enter the details for each transaction. If you're not sure how to do that, follow the steps below.

Click here to create a new activity

create a new activity

Naming a new activity


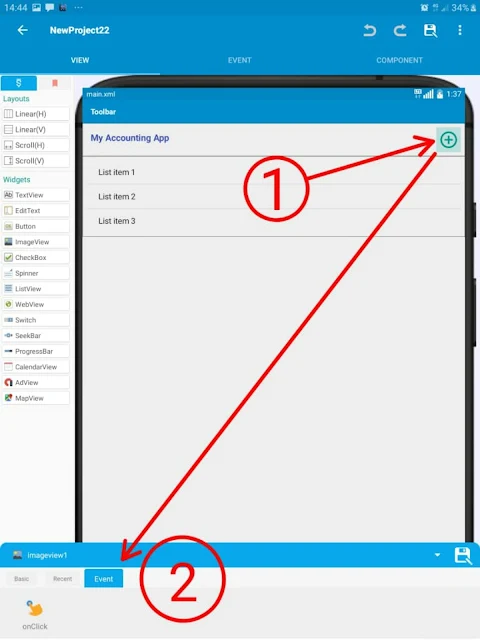
STEP 15: Imageview logic


After creating our new activity, let's place the logic to move to this new event. I will use the imageview as a button. So I will navigate to the imageview's onClick event as shown in the image below.

Go to button onClick


STEP 16: Create an intent component.


This will move use from  the MainActivity to NewtransactionActivity


Intent logic

STEP 17: Set up the layout


On the new transaction activity that we created let's create the following layout. I have used linear Horizontal layouts, textviews, edittexts and a button. So our user will enter the data on the edittext fields and then click the save button. When they click the save button it will revert to the MainActivity and display our new transaction.

Create new transaction layout


STEP 18: Go to save button onClick


After creating our layout, let's navigate to the button's onClick event and place our logic for saving data.

Navigate to button onClick event


STEP 19: Add components, variables and list


Create the following:

• a number variable with the name "position"
• a map variable with the name "map"
• a listmap list with the name "ledger" (This should be the same name as in our MainActivity".
• a shared preferences component with the same name as on our MainActivity. (We used the name "appdata".

The image below shows how to create a map variable and a number variable.


Create a variable


STEP 20: Add your logic for saving data.


The blocks should look as shown in the image below. 

NB: the keys should be identical to the ones we used in the previous activity.

Save button onClick logic


STEP 21: onCreate logic


Go to the onCreate event of your second page and place the following blocks for your logic. These will determine what is shown if it's a new transaction or it's an existing transaction. This is helpful when your user wants to edit the data.


New transaction onStart logic


STEP 22: Run your app


That's it for functionality. At this point you can run your app. If you click the plus button and add data, it should give us the screen below.


Accounting app screenshot


LISTVIEW ROUBLESHOOTING

If you face any challenges running your app, then check the following.


• Make sure your shared preferences components on both activities have the same name.

• Make sure your keys are identical. The keys are case sensitive so "Date" and "date" are not the same.

• Delete or remove any blank space in your keys. This can be before or after your text.

• If your list contains items and you decide to change the keys, this might cause your app to crash


EXTRAS

You might want to improve on this by checking out the following tutorials

1. Appearance


CONCLUSION

I hope you had fun with this tutorial and that it has opened up your mind to the possibilities of what you can create with Sketchware. You can now build on the items we covered to create your own app. This requires no prior coding experience. Common examples of apps where adaptations of this have been used are:

• Call history

• Contact List

• Notes App

• Alarm

• To do list

• Journal

• Games (Leaderboards/Records)

• Goal Setting apps

• Calendar

• Location tracking

• Bookkeeping and accounting apps

• Reception app

• School app

• Database app

• Data collation apps

• Exercise App

• Inventory management apps


I'd love to hear your thoughts and experiences building your own apps. If you need further help, let me know in the comments section or via email.

Create your own record keeping app pinterest pin


Comments

Ashura Yokai said…
can you show tutorial on how we can delete the data of the listmap that we have made in this tutorial?

Popular posts from this blog

Hip hop and RnB songs to apologize to your partner

Love is a beautiful thing, but it often goes wrong. This often leads to pain, suffering and sorrow.  Being imperfect beings, hearts tend to get broken all the time regardless how hard we may try to avoid it.  The heartbreak is often inadvertent but at times we find ourselves in the wrong. An oversight, a word unsaid or even a lapse in our judgement can cause our loved ones harm. This doesn't always have to be the end though. Oftentimes, relationships can be mended by simply uttering three simple words: "I AM SORRY". This article is a collection of some of my favourite 'I'm sorry' songs. I hope you'll enjoy these apology songs, but more importantly, I hope you will get a few quotables and some wisdom nuggets from them.  The best apology however, is to change behaviour (got that from a Jay Z interview) so as you apologize, please remember that it was your actions that hurt them. The best apology is one which involves you not repeating those same mistakes aga

Php date: How to get the first and last day of the week

In this tutorial, I'll show you how to get the first and last day of the week in php. By default, in PHP the week runs from Monday to Sunday. However we'll cover two methods to get the first and last day for both those who consider Sunday or Monday as their first day of the week. We will be using 2 functions to achieve this: date() strtotime() We will use a combination of these two functions and store the result in a variable.  How to get the first day of the week If you want to get Sunday, use this method: $firstday = date('l Y-m-d', strtotime("sunday -1 week")); echo $firstday; If you want to get the date for Monday, this current week, use this method: $monday = date('l Y-m-d', strtotime("monday -1 week ")); echo $monday; How to get the last day of the week The following code will give you Saturday as the last day of the current week. $lastday = date('l Y-m-d', strtotime("saturday 0 week")); echo $last

How to easily create background notifications in Sketchware(original)

How to easily create background notifications in Sketchware(original) One of the keys to building a successful app is to find mechanisms that will keep your users engaged. You can do this by using background notifications. This tutorial will show you how to do that in Sketchware. We will cover: 1. How to create notifications in Sketchware 2. How to show these notifications even when the app is closed.