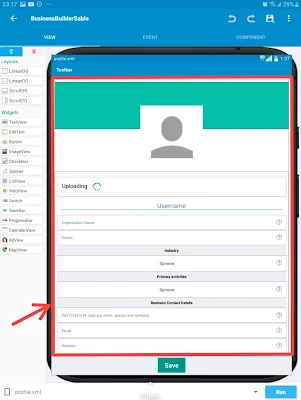
User profiles allow us to showcase our uniqueness by adding custom pics and customizing our personal information. This tutorial will take you through the process of creating the profile section of our social media app.
We will start by creating a new activity with the name "profile".
Building the profile interface
Next we will build our layout for the profile section. We will use imageviews, linears and textviews to display the user data.
Our layout will look as shown above in Sketchware. You can customize yours. In the image above I have used:
1. Scrollview(vertical) This will allow me to scroll up and down if the data overlaps
2. linears to position my widgets horizontally and vertically.
3. Textviews for the labels
4. Imageview for the user's profile picture as well as the Help Tips.
5. Edittexts where the user will enter their user details.
6. Spinner to allow the user to choose from predetermined options.
7. Button that will be clicked when the user wants to update or save data.
Setting up our logic to select a profile picture
We want our user to be able to change their profile picture in our social media app. We will therefore navigate to our imageview onClick event. This is where we will place our logic to choose a profile picture.
So we will need to create a file picker component. Follow the steps below to create the file picker component.
Choose the 'File picker' component.
Name your component. I named my component 'propic'
Click the downward arrow as shown below to choose the mime type. This will determine what type of files can be picked.
Your screen should look similar to the one below. Click add and your file flicker component will be created.
After we have created our component, let's place our file picker component as shown below. This allows the user to pick a file when they click the image. I am placing my file picker on "When imageview clicked". You can put this login on a button or linear
The next step is to set up our logic for what happens when a file is picked. Click the back button.
So let's go to the Components section to add a new onFilePicked event.
In our onFilesPicked event, let's set up our logic. We will start by creating 2 string variables. We will name our string 'imagepath' and 'imagename'. Whenever an image is picked we will save its path as a string and we will also save the image name. We will also use a block to resize our image to a circle from its path and then save it in our awesome app's folder for future use. Our logic will look as follows:
Uploading our image to firebase
We will need to create and add the following Firebase components to our project.
1. A firebase auth component. This will give us the user's ID
2. A firebase storage component- this will allow us to save the user's image to a specific folder.
3. Firebase databases component. This will save the user's information such as name and any other data.
To create a component, follow the steps below.
1. Go to the components menu
Click the "red" button in the lower right corner of your screen to create a new firebase auth component.
Give your component a name. In my example, I have named my component "auth" which is short for "authentication".
Create a firebase Database component. I named my component "userdata" and I set the directory for this to "users/userprofile". This means that in my database a folder with the name "users" will be created. This folder will contain another folder named "userprofile"
After completing the above steps, your components should now look as shown in the image below. Do not mind the order, just make sure the necessary details are there.
The next step is to add our logic to the button click. When the user chooses a picture, we will only upload the picture once they click the "Save" button. On our save button clicked we will need to create a new map variable. I named my variable 'map'.
After creating the variable, place your blocks as shown below.
The next step is to navigate to the onUploadProgress event.
Here we will set what happens while the file is uploading. You can add a dialog box showing the upload progress. In this example I will simply toast a message saying uploading and the percentage uploaded.
Navigate to the on upload success event. Place the following blocks. You will notice that these blocks contain an extra key with the name 'pic'. Simply drag the purple 'downloadUrl' block to your logic.
The above steps will upload your data to firebase. We however need to set our database to give us a signal once data has been uploaded. We will do this by following the steps below.
Displaying our data from firebase
We will navigate to our onChildAdded event. This can be found in our components section as shown below.
In our onChild added event, we will need to create a string list. This string list will store the user IDs from our firebase app.
We will search this list for our user's ID and if the list contains our user, we will get the user's details.
All this will be done using the following logic:
We will also want to replicate the same logic in our onChildChanged event. This will make sure the new data is immediately displayed if the user makes any change.
I hope you found this tutorial helpful and you're making significant progress in the creation of your social media app.


Comments