How to easily create background notifications in Sketchware(original)
1. How to create notifications in Sketchware
2. How to show these notifications even when the app is closed.
You might also like: How to set Firebase Rules
We will start by creating a new project. If you do not know how to create a new project please check out this article here. Once we have created our project, let us create a more block to place our code. Navigate to the events menu and then to the moreblock section as shown in the image above.
Create a moreBlock. I have created a moreblock with the name "BackgroundActivity" with a boolean variable named "run." See the image below for how to add the boolean variable.
Place the following block in the moreBlock
Background activity code:
moveTaskToBack(_run);
That will move our task to the background.
Please note, that at this point we haven't yet added any background task. We just added the moreblock for it
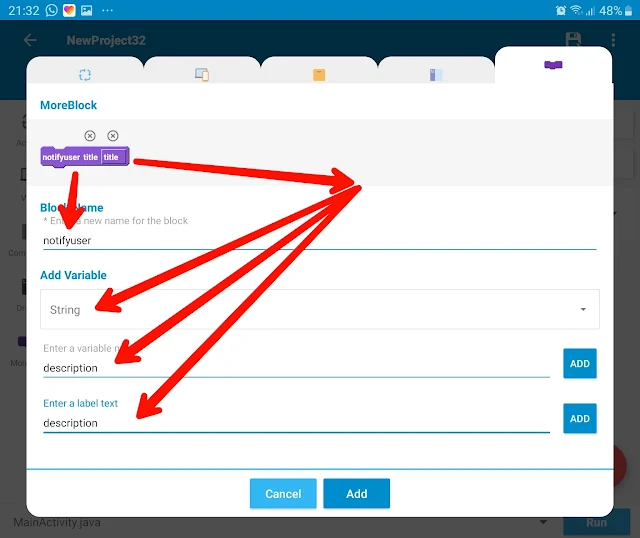
Next, we want to create a notification. We will start by creating a moreblock. We will add two string variables to our moreblock.
In the notifyUser moreblock add the following blocks.
Add the following blocks in the add source directly blocks:
Block 1:
try {
Block 2:
if (Build.VERSION.SDK_INT >= Build.VERSION_CODES.O) { CharSequence name = "Messages"; String description = "You have new messages"; int importance = NotificationManager.IMPORTANCE_MAX; NotificationChannel channel = new NotificationChannel("id 1", name, importance); channel.setDescription(description); NotificationManager notificationManager = getSystemService(NotificationManager.class); notificationManager.createNotificationChannel(channel); }
Block 3
Intent intent = new Intent(MainActivity.this, MainActivity.class); intent.setFlags(Intent.FLAG_ACTIVITY_NEW_TASK | Intent.FLAG_ACTIVITY_CLEAR_TASK); PendingIntent pendingIntent = PendingIntent.getActivity(MainActivity.this, 0, intent, 0); androidx.core.app.NotificationCompat.Builder builder = new androidx.core.app.NotificationCompat.Builder(MainActivity.this, "id 1") .setSmallIcon(R.drawable.app_icon) .setSound(RingtoneManager.getDefaultUri(RingtoneManager.TYPE_NOTIFICATION)) .setContentTitle(_title) .setContentText(_description) .setPriority(androidx.core.app.NotificationCompat.PRIORITY_MAX) .setContentIntent(pendingIntent) .setAutoCancel(true); androidx.core.app.NotificationManagerCompat notificationManager = androidx.core.app.NotificationManagerCompat.from(MainActivity.this); notificationManager.notify(1, builder.build());
Block 4
} catch (Exception e) {Toast.makeText(this, e.getMessage(), Toast.LENGTH_LONG).show(); }
Now that we have our moreBlocks... we will use a timer to run in the background and when the phone time based on our calendar component is equal to our we now need to place our logic onBackpressed or onStop...
We will need to create
1. A timer component
2. A calendar component
So our logic will look like this
We can now run our app... then when we click the back button our logic will be triggered. Our notification will look like this:
Variations: Sending message notifications if app is closed
If you're creating a chat app, you can play around with this logic to create a notification whenever there is a new message. The key is in adjusting the timer. This determines the frequency after which your app checks for messages. The logic below shows how to check for messages every 2 hours. It's not perfect but I'm sure you understand. So you can adjust this to suit your own system.... maybe add the user's name or picture.
I hope you found this very helpful. I look forward to reading about your awesome apps someday.


Comments
Class Code:
}
class ThreadLoader {
private Runnable after;
private android.os.Handler handler = new android.os.Handler() {
@Override
public void handleMessage(android.os.Message msg) {
switch (msg.what) {
case 0x2:
after.run();
}
super.handleMessage(msg);
}
};
public void run(final Runnable runnable, Runnable _after)
{
after = _after;
new Thread(new Runnable() {
@Override
public void run() {
runnable.run();
handler.sendEmptyMessage(0x2);
}
}).start();
}
}
public void nothing (){
//end of class
Now to do whenever you want to do a very long ram consuming process use this code together with the class
Code:
new ThreadLoader().run(new Runnable() {
@Override
public void run() {
//Here we can perform our background activities to prevent the UI from freezing when the service starts
}, new Runnable() {
@Override
public void run() {
//Here we do something to the UI when the background task has been completed in this case we synce the listview
}
});
//That's all
how to integrate payment gateway or UPI payment in app from created by sketchware.
May you always be happy.